

If you’ve ever ended a ride with sore knees or a stiff back, chances are your e-bike seat isn’t set up right. A proper seat adjustment can make a world of difference—not just for comfort, but also for how efficiently you ride.
Whether you’re a daily commuter or a weekend explorer, this guide will walk you through how to adjust E-bike seat the right way. It’s beginner-friendly, jargon-free, and packed with helpful tips to make every ride smoother and more enjoyable.
Table of Contents
Table of Contents
Why Seat Adjustment Is So Important
Riding an e-bike should feel smooth and easy, not painful or tiring. But if your saddle isn’t in the right position, your body will let you know pretty quickly.
Here are four big reasons why correct seat adjustment matters:

- Improved Ergonomics: A properly adjusted seat supports better posture and reduces strain on your joints.
- Reduced Pain: Common complaints like cycling knee pain, numbness, and backaches often stem from poor saddle setup.
- Increased Pedal Efficiency: When your saddle height and position are correct, each pedal stroke becomes more effective, saving energy.
- Better Body Alignment: A well-aligned riding posture helps you feel balanced and confident, especially on longer rides.
If your bike doesn’t feel like an extension of your body, it’s time to make some adjustments.
Tools You’ll Need
Before adjusting anything, gather these simple tools:
- Allen wrench (typically 5mm or 6mm, depending on your seat post clamp)
- Measuring tape
- Spirit level (helpful for saddle tilt)
- A wall or doorway to lean your bike against (or a bike trainer if you have one)
Also, wear the shoes you normally ride in for the most accurate setup.
Step-by-Step: How to Adjust E-Bike Seat
1. Find the Right Saddle Height
Getting your saddle height right is crucial. Too low, and you’ll stress your knees. Too high, and your hips will rock as you ride, causing discomfort.
Try the Heel-to-Pedal Method:
- Sit on your e-bike with one heel resting on the pedal.
- Rotate the pedal backward to the lowest point (6 o’clock position).
- Your leg should be fully extended without your hips shifting.
Once this is set, try pedaling with the ball of your foot. Your knee should now have a slight bend at the bottom of the pedal stroke—this is the ideal height for most riders.
Quick Tip: If you’re bouncing in the saddle, your seat may be too high. If your knees feel cramped or sore, it’s likely too low.
2. Check the Fore-Aft Saddle Position
Next, you’ll want to make sure your saddle isn’t too far forward or too far back. This affects your balance and pedal power.
Use the Knee-Over-Pedal Method:
- Set your pedals in a horizontal position (3 and 9 o’clock).
- Sit on your bike and drop a plumb line (or a string with a small weight) from the front of your kneecap.
- The line should hang directly over the center of your pedal.
If it’s too far forward, you risk knee strain. If it’s too far back, your pedal power may drop.
Adjust the saddle forward or backward on the rails until you find the sweet spot.
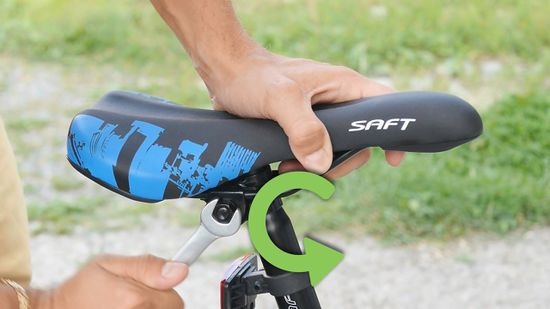
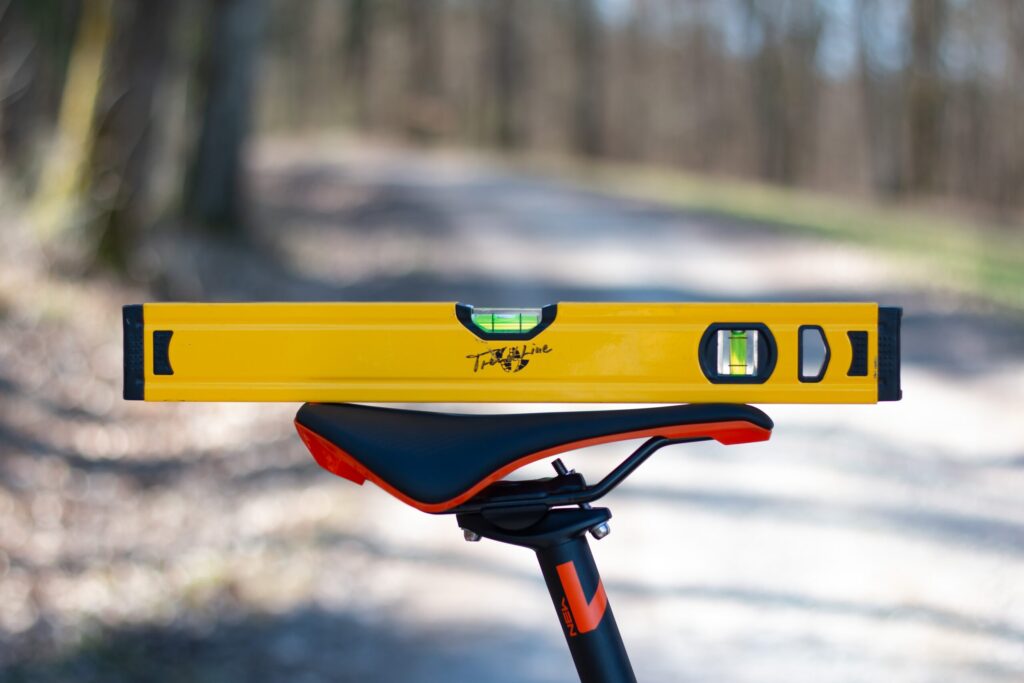
3. Adjust the Tilt of the Saddle
Many riders overlook this one, but saddle tilt can make or break your ride comfort.
The Best Starting Point? Level.
- Use a spirit level to check the top of your saddle.
- Adjust until it’s flat from front to back.
A tilted-down saddle can make you slide forward, placing pressure on your hands and wrists. A tilted-up saddle can cause chafing or numbness. Stay level, then fine-tune based on how your body feels.
4. Match Seat Height with Handlebar Position
A properly adjusted seat also works hand-in-hand with handlebar height.
If your handlebars are much lower than your saddle, you’ll hunch forward, which may cause back or neck strain. If they’re too high, you might lose a bit of control or efficiency.
Beginner’s Guide:
- Handlebars should be roughly level with or slightly higher than your seat.
- This encourages a more upright, comfortable position, especially great for casual and city riders.
Try different setups and go with what feels most natural for your style of riding.
Test Ride and Fine-Tuning Tips
Now it’s time for a test ride. Spend 5–10 minutes riding in a safe area. Here’s what to check for:
- Knee pain? Lower the saddle slightly.
- Hips rocking? The saddle might be too high.
- Hand or wrist discomfort? Re-check handlebar height and saddle tilt.
- Lower back strain? Consider adjusting your posture or handlebar position.
Make small changes one at a time. Ride, adjust, repeat.
Pro Tip: Take note of any pressure points or fatigue during longer rides. That feedback is key to making fine-tuned improvements.
Bonus Tips for Long-Term Comfort
Comfort isn’t a one-and-done deal. As your riding habits change, so should your bike setup. Here are a few extras to keep in mind:
- Upgrade Your Saddle: Gel or memory foam saddles can be a game-changer for comfort.
- Wear Padded Shorts: These help reduce friction and pressure, especially on long rides.
- Try a Suspension Seat Post: These absorb road vibrations and bumps.
- Adjust Seasonally: Your posture, flexibility, and even riding goals may change throughout the year. Revisit your setup regularly.
- Record Your Settings: Measure and write down your saddle height, tilt, and position for easy reference.
Common Mistakes to Avoid
Even experienced riders make these errors. Here’s what to avoid:
- Setting the saddle too high: Leads to hip rocking and muscle fatigue.
- Riding with a low saddle: Limits leg extension and strains knees.
- Ignoring saddle tilt: Discomfort and sliding are common signs it’s off.
- Focusing only on the seat: Your handlebar position matters too.
- Not listening to your body: Pain is a sign that something needs adjusting.
Fix these early, and you’ll enjoy smoother, pain-free rides.
Final Thoughts
Adjusting your e-bike seat might feel like a minor detail, but it has a massive impact on how you ride. The right saddle height, tilt, and position will help you ride longer, more comfortably, and with less risk of injury.
So don’t just hop on and go—take a few minutes to dial in your setup. Your body (and your bike) will thank you every mile of the way.
Got any tips of your own? Share them below—we’re all here to ride smarter together!


